Tuesday, July 17, 2012

Art Room Project - Final

This is the twelfth post in my Art Room Project series. Find the Table of Contents at the first post, Getting Started.

Details

I installed the hardware. They are a pewter finish with a mixture of pulls and knobs. The contrasting silver pops against the deep red and black wood grain. I'm very happy with the results.

Also added a new overhead light. Had to move the electrical around a little, but no hassle if you've done it once or twice.

The only parts left on the room is finding the perfect chair, building some more hangings for the slatwall (see below), and organizing all my art crap in a meaningful way.


Slatwall Goodies

The slatwall allows me to add/move/remove hooks and other accessories. Here I have a hook holding up first painting (at 6 years old) and a paper towel holder. Instead of mounting the paper towel holder on a wall and then having to live with that decision until I take out the drill and screwdriver again, I just use a slatwall mount I made.


Mount Details

The mount is just a set of hooks on the back of a board. I custom make the hooks by using aluminum strips and bending brake and epoxy them to the board. A little paint and we have a mount suitable for mounting.


I can also add neat things like my old-tyme Boston pencil sharpener.


We are officially done with the interesting parts of the project, so I can finally close the books on this adventure. Stay tuned for more projects!


Tuesday, October 25, 2011

Serene Green Stream

I love being around the water. A lake, a river, a stream--even a full bathtub relaxes me. I finally have my serene water wallpaper for my PC. I also have the high-res image posted on Flickr.

Can you find the fish? See the high-res image for more details.


I took this picture at Chartres, France. A gentle stream meanders through this ancient town. I enjoy this picture because it shows off my favorite features of water: the translucent colors, sunlight dancing through the bed and reflecting across the surface and deep, cool shadows. The swaying vegetation provides cover for small fish. The water invites us to slow down and take in this timeless scene.

I hope you enjoy it as much as I do.

Monday, October 24, 2011

Art Room Project - Begin the Finish

This is the eleventh post in my Art Room Project series. Find the Table of Contents at the first post, Getting Started.

The Finish

From my original plans, I knew I wanted a 2-tone look to my cabinets and desk. I stained all the doors, drawer fronts and desk top and painted the rest. The trick was finding the right 2 color stain/paint combo. I wanted it to be a classic style, but not too dark.

The big lesson learned with this step was patience. For a good finish, there are many steps, and each step is important.

Painting

Painting the shell
We chose a taupe color for the cabinets. The painting was fairly easy: 2 coats of primer, sanding between coats. 2 coats of paint. With the coats of primer and proper sanding, the final product was a smooth and durable finish.

Another extra step was to put a coat of Polyurethane inside the drawers and cabinets. Most skip this step, but since all sort of paint, glue and other things will be thrown around in this room, a little extra protection helps.


Staining

This was the most difficult part of the entire project. The trial and error process of finding the right stain for my oak panels was tedious and time consuming. Every step had to be documented with sanding steps, what grit I used, how long did I let the stain soak, how much did I wipe off, what type of sealer I used, etc.

I finally hit on look I wanted--a nice red/brown wood with deep black grain.


For each door, drawer front and the desk, this was my process:

  1. Sand raw oak to a 220 grit finish and vacuum dust.
  2. Stain with Red Mahogany, let soak for 5 minutes.
  3. Wipe off stain and let dry overnight.
  4. Re-sand again to 220 grit. (This was the key to getting the deep, high contrast grain. The wood lightened, but the grain stayed dark.)
  5. Stain and soak for 5 minutes. Wipe off and dry.
  6. Stain again and soak for 5 minutes. Wipe off and dry.
  7. First coat of Polyurethane. Dry for a few hours.
  8. Light sanding and wipe off dust.
  9. Second coat of Poly and let dry.
  10. Light sanding and wipe off dust.
  11. Apply 3 coats of furniture wax.

I'm happy with the results. It has a deep color and matches the flooring very well. The Polyurethane makes it durable. The wax makes it feel silky like good furniture.


Slatwall

Slatwall is popular in retail shops. It allows for easy setup and removing of all kinds of hanging displays, shelves, hooks, whatever. It serves the same function as pegboard but is a little easier on the eyes. I'm using Slatwall on the walls around the desk. Later I'll make custom shelves and pegs for my art stuff, and the Slatwall will make it easy to hang and move around.


Ready to paint
You can order Slatwall in 4' by 8' sheets, but I decided to make my own. I used 1/2" MDF, cut the strips to size and routed the backs. I then glued each strip to a hardboard panel. This allowed me to customize the look with a simple border and trim, making it feel a little less utilitarian.

The Slatwall is installed and ready for primer and paint.

In the picture, also note I've installed under-cabinet LED lights for a little extra brightness.

What's Next?

After the finishing details are done, we need to pick out a new overhead light, some knobs and pulls and a new task chair.

Almost done!

Monday, May 30, 2011

Art Room Project - Project Drawers

This is the tenth post in my Art Room Project series. Find the Table of Contents at the first post, Getting Started.

Project Drawers

A project drawer is used to organize project supplies: drawing, painting, sculpture, fly tying, or whatever I tackle in the future. I can remove them and set them aside while working, then slide them back to their cubby holes when finished. Organized and neat, like I like it.

This is a small box, made from 1/2" inch birch plywood with an oak front.


Plywood on its way to being useful.


The cubby holes with their project drawers. They sit about 1/4 inch proud and will be easier to get out once Teresa picks out some hardware.
A drawer ready to serve. Note how the wood grain lines up when the drawers are closed. That's not an accident.

The bigger drawers in the middle could get heavy when loaded with big stuff. To remove them, sliding wood on wood wouldn't work. I added rollers on the back to help.


The rollers sit a fraction of an inch lower than the frame, and only on the back. Lift and remove from the cubby, and when it sits on the desk, there's no worry of it rolling off.


Next I'll start the finish. A few coats of stain and poly and it'll be ready for the final touches.

Thursday, March 10, 2011

Art Room Project - Cabinet Doors

This is the ninth post in my Art Room Project series. Find the Table of Contents at the first post, Getting Started.


Your Door is Ajar

I built and hung my first set of doors. I'm happy to report my math worked. The doors cover the right amount of cabinet, 1/2" all around. They are relatively square, and meet close to the middle where required.

I splurged and bought the European style hinges, the fancy style with the six way adjustment, so that helped with how they fit. Plus, the hinges were super easy to install and hang. No trouble at all.

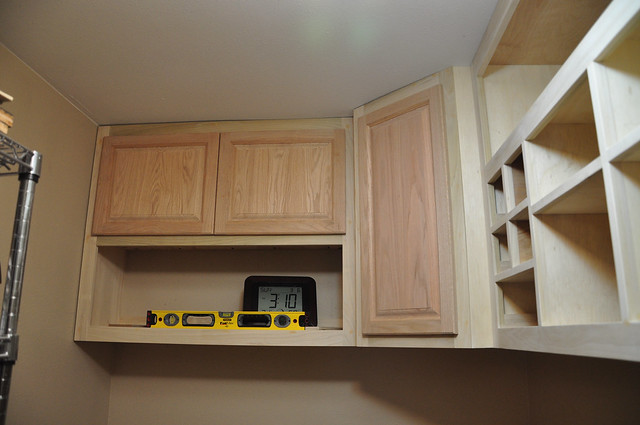
Here we are with the far set of cabinets. The red oak looks a little strange on the white poplar, but remember I'll be doing a two tone finish later.


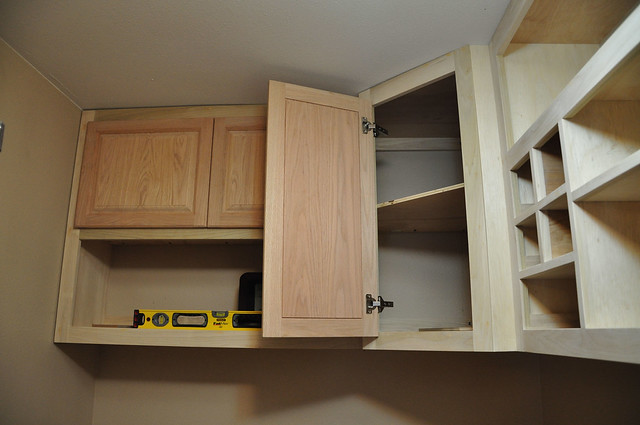
The same image with the door open, in case you can't use your imagination for some reason.

Here you can see the fancy hinges.
View of the side cabinets from the door.


Side cabinets from inside. Door open for dramatic effect.

No more doors to build. Now ends another phase to this huge project. Only a few more phases left!

Next Post: Cubby Drawers